OSPRay renderer pro
OSPRay is a software-based ray-tracing engine, which can generate high-fidelity scene renderings including global illumination effects, shadows and depth of field (focal blur). The OSPRay renderer has a smaller memory footprint than the Tachyon renderer. It is thus suitable for rendering very large datasets with higher visual quality than the default OpenGL renderer.
For more information on the capabilities of the OSPRay engine and its technical background, please visit the website https://www.ospray.org. The OSPRay documentation contains more in-depth information on this rendering engine’s various parameters.
The “More Options” (vertical ellipsis) button next to each numerical parameter opens a context menu with the option to reset each parameter to its default value.
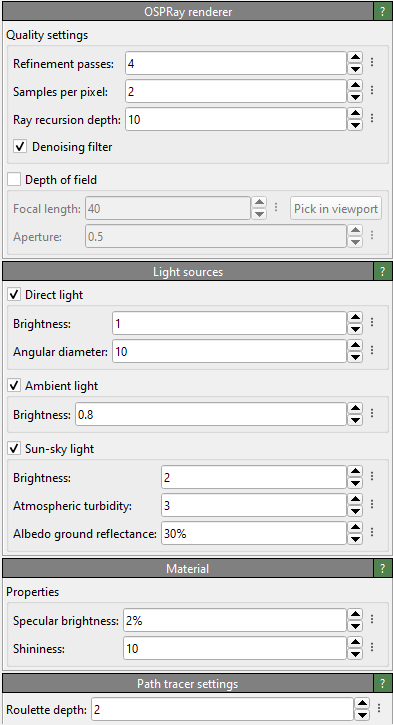
Quality settings
- Refinement passes
OSPRay uses a progressive rendering method, which further refines the generated image during each rendering pass. This parameter controls the number of refinement iterations to compute (default value: 4).
- Samples per pixel
The number of ray-tracing samples computed per pixel (default value: 8). Larger values can help reduce aliasing artifacts and will yield better results, especially if the depth of field option is turned on.
- Ray recursion depth
The maximum number of recursion steps taken during ray-tracing (default value: 10). Normally, 1 or 2 is enough, but when rendering many overlapping semi-transparent objects, a larger recursion depth may be needed.
- Roulette depth
Ray recursion depth at which to start Russian roulette termination (default value: 5).
- Denoising filter
Applies a denoising filter to the rendered image to reduce Monte Carlo noise inherent to stochastic methods such as path tracing.
- Depth of field
When depth-of-field rendering is active, only objects located exactly at the distance from the camera specified by the focal length will appear sharp. Objects closer to or farther from the camera will appear blurred. To focus on a specific object, use the Pick in viewport button and click on the desired object in the viewport to be rendered. The focal length parameter will be automatically adjusted so that the picked location is in focus. The aperture radius controls how blurred out-of-focus objects will appear (default: 0.5).
Note that the focal blur effect requires a perspective projection; it does not work in viewports using a parallel projection.
Light sources
- Direct light
Enables a directional light source positioned behind the camera and pointing roughly along the viewing direction. The angular diameter specifies the apparent size (angle in degrees) of the light source. Setting the angular diameter to a value greater than zero yields soft shadows. For instance, the apparent size of the sun is about 0.53°.
- Ambient light
The ambient light surrounds the entire scene and illuminates it from infinity with constant radiance.
- Sun-sky light
The sun-sky light produces the light typically coming from the sky and the sun in an outdoor scene. The radiance values are calculated using the Hošek-Wilkie sky model and solar radiance function. The zenith of the sky as well as the sun are positioned along the positive Z axis of the scene and are independent of the camera orientation.
Material type
The OSPRay renderer supports two material types: Standard and Principled. These correspond to the OBJ and Principled materials described in the documentation of OSPRay, respectively.
The selected material type and its settings are applied globally to all scene objects.

Standard material
Standard material
The Standard material type is based on the Phong reflection model, which is suitable for many purposes. It supports specular highlights, controlled by the following parameters:
- Specular brightness
The specular reflectivity of the material (default value: 2%).
- Shininess
Specular Phong exponent, which is usually in the range between 2.0 and 10000.0 (default value: 10.0).
Principled material
The Principled material type can reproduce a wide variety of materials, e.g. plastic, metal, and glass. It consists of a mixture of a metallic and a dielectric/diffuse material model. The relative contribution of these models is controlled using the metalness parameter.
The table below shows how the Principled material behaves for different parameter settings. The Blender wiki also offers a good visual overview of the various parameters of the Principled material and how they affect the appearance.
|
|
|
|---|---|---|
Roughness: 10% |
Roughness: 30% |
Roughness: 50% |
Metalness: 100% |
Metalness: 10% |
Metalness: 30% |
Specular brightness 80% |
Specular brightness 80% |
Specular brightness 80% |
Index of refraction: 1.0 |
Index of refraction: 1.0 |
Index of refraction: 0.1 |


- Roughness
Controls the variation of microfacets and thus how polished the metal looks (default value: 30%). A value of 0% gives a perfectly polished mirror surface, while a value of 100% gives a completely rough surface.
- Metalness
Gradually switches from a dielectric/diffuse material to a metallic material (default value: 10%).
- Specular brightness
Controls the specular reflectivity of the dielectric/diffuse component of the material (default value: 80%).
- Index of refraction
Controls the index of refraction (IoR) for specular reflection. For most materials, the IoR is between 1.0 (air) and 4.0 (germanium). Default value: 1.0
Post-processing effects
- Outlines
Enables the drawing of outlines along object edges. The outlines are depth-aware, meaning that they are only drawn when the depth difference between two overlapping objects exceeds a certain threshold. Optionally, the width of the outlines can be adjusted based on the depth difference, which can help to improve visibility of outlines in complex scenes.

- Depth Difference & Outline Width
- Uniform Width Mode
In this mode, a single value is used for both the depth difference and the outline width. An outline with a constant width is drawn around all objects that have a depth difference greater than the specified value relative to the background.
- Variable Width Mode
In this mode, the outline width increases linearly from the minimum to the maximum width as the depth difference between overlapping objects varies from the minimum to the maximum depth difference. When switching from Uniform Width Mode to Variable Width Mode, any missing values for depth or line width will be automatically set to their default values.
- Custom Color
When disabled, the outline color is automatically determined based on the background color: white outlines for dark backgrounds and black outlines for light backgrounds. When enabled, the manually selected color is used instead.
See also
OSPRayRenderer (Python API)